
After the Traffic Light Controller seminar, the traffic light vendor has been getting a lot of follow-up questions asking about GPIOs and what else they can do besides making the traffic light module's LEDs light up. If there's enough interest, they've agreed to offer another seminar on microcontroller GPIOs.
We had a really good turn out for the traffic light hardware cross-training seminar. And a lot of folks wanted to learn more, particularly about the the microcontroller GPIOs and how they work. The traffic light manufacturer has agreed to host another seminar and the mayor's office says there's money in the budget. So once again, we're opening this up to the hardware team and software developers alike.
So far we've been using GPIOs to controll the red, yellow, green LED traffic light module plugged into the breadboard. There's also an LED module built directly onto the ESP32-C3 board. It's called a NeoPixel and it can display a variety of colors using only a single GPIO connection.
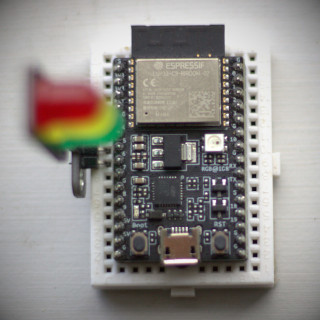
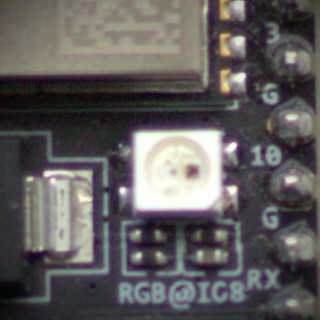
Take a look at the photos below. Compare them to the ESP32-C3 microcontroller board you're working with and see if you can locate the NeoPixel. It's the white square with a clear, round area in the middle.


Notice the white text printed below. It has some imperfections, but it reads: RGB@IO8. IO8 refers to GPIO number 8. (There's not a lot of space, so the GP part of GPIO is left off.) This label tells us the ESP32-C3's built-in NeoPixel is controlled by GPIO 8.
Take a look at the MicroPython code sample below.
from machine import Pin
from neopixel import NeoPixel
from time import sleep

walk_signal = NeoPixel(Pin(8), 1)

while True:
    walk_signal[0] = (255, 0, 0)
    walk_signal.write()
    sleep(5)

    walk_signal[0] = (255, 255, 255)
    walk_signal.write()
    sleep(5)
This code sample lights up the NeoPixel in red to represent don't walk and white to represent walk. Use the Raspberry Pi development workstation to run the code on your ESP32-C3 and watch what happens.
You can access the Visual Studio Code server and the command prompt on the Raspberry Pi using the links below.
The code shown above is also available in the ~/Code directory of your Raspberry Pi development workstation.
Running the programs on the ESP32-C3 is done by logging into the Raspberry Pi via secure shell and using the mpremote command like in the example below.
login: student
password: ********

pi:~$ cd Code
pi:~/Code$ cd neopixel
pi:~/Code/neopixel$ mpremote run walk_signal.py
Remember you can press CTRL+C to get the command prompt back. Refer to the first Traffic Light activity if you need a refresher.
The MicroPython code for the NeoPixel walk signal looks a lot like the flashing red traffic light from the first activity.
But, there are differences as well.
from neopixel import NeoPixel is new..on() and .off() to control the LED.walk_signal[0] = (255, 0, 0) statement is new, as is walk_signal.write()So why all these changes?
Very simply, the NeoPixel needs an external module because it has a controller chip built into it. (Look closely at the NeoPixel when it's off and you can see a tiny dark square inside the round part.) The module provides the software routines that communicate with the NeoPixel controller.
The controller chip and software module are needed because the NeoPixel actually has three LEDs built into it, red, green, and blue. (Remember the RGB label printed on the microcontroller board? RGB stands for red, green, blue.) The controller chip together with the software module can also control the brightness of each of these three built-in LEDs. And all of this is done using a single GPIO pin.
Take a look at the code sample, focusing on the lines in the while
loop. (See below.) Notice the walk_signal[0] = (255, 0, 0)
and walk_signal[0] = (255, 255, 255) statements. This
is what sets the NeoPixel to red and white, respectively. The three
numbers represent the brightness of the individual red, green, and
blue LEDs. (Red, green, and blue light combined makes white.)
while True:
    walk_signal[0] = (255, 0, 0)
    walk_signal.write()
    sleep(5)

    walk_signal[0] = (255, 255, 255)
    walk_signal.write()
    sleep(5)
Try making some temporary changes to the code to make the NeoPixel cycle between red and green instead of red and white.
Here's a few hints:
walk_signal[0] = (255, 0, 0) and
walk_signal[0] = (255, 255, 255)
walk_signal[0] = (RED, GREEN, BLUE)
walk_signal[0] = (255, 0, 0) changes
the NeoPixel to red at maximum brightness.
walk_signal[0] = (255, 255, 255)
with walk_signal[0] = (0, 255, 0) will change
the NeoPixel to green instead of white.
Have some fun experimenting with different color combinations. Be sure to change the code back to red and white when you're done so you're ready for the next part.
As the program is configured now, it just cycles the NeoPixel from red (don't walk) to white (walk) over and over again in an endless loop. The traffic signal isn't doing anything at all in this example. For this next part, we'll look at what it would take to bring back the traffic light and make it work together with the walk signal.
First, let's review the code that cycles the traffic light LEDs between red, green, and yellow signals.
from machine import Pin
from time import sleep

red = Pin(4, Pin.OUT)
yellow = Pin(5, Pin.OUT)
green = Pin(6, Pin.OUT)

while True:
    red.on()
    yellow.off()
    green.off()
    sleep(5)

    red.off()
    yellow.off()
    green.on()
    sleep(4)

    red.off()
    yellow.on()
    green.off()
    sleep(1)
Now, compare it to the walk signal code shown below.
from machine import Pin
from neopixel import NeoPixel
from time import sleep

walk_signal = NeoPixel(Pin(8), 1)

while True:
    walk_signal[0] = (255, 0, 0)
    walk_signal.write()
    sleep(5)

    walk_signal[0] = (255, 255, 255)
    walk_signal.write()
    sleep(5)
Notice the similarities and differences between the two programs.
See if you can combine the two programs into a new one. The new code should only turn on the walk signal only when traffic is stopped at a red light. When the traffic signal is showing green or yellow, the walk sign should show red for don't walk.
from machine import Pin
from neopixel import NeoPixel
from time import sleep

red = Pin(4, Pin.OUT)
yellow = Pin(5, Pin.OUT)
green = Pin(6, Pin.OUT)
walk_signal = NeoPixel(Pin(8), 1)

while True:
    red.on()
    yellow.off()
    green.off()
    walk_signal[0] = (255, 255, 255)
    walk_signal.write()
    sleep(5)

    red.off()
    yellow.off()
    green.on()
    walk_signal[0] = (255, 0, 0)
    walk_signal.write()
    sleep(4)

    red.off()
    yellow.on()
    green.off()
    # The walk signal is already red, so no need to set it again.
    sleep(1)