unifi-opnsense
UniFi / OPNSense IoT Network
This guide shows how to create a separate Internet of Things (IoT) WiFi VLAN for your home using a Ubiquiti UniFi access point, UniFi gigabit switch, and an OPNSense firewall installed on comodity x86 hardware.
Overview
Here’s a high-level look at the network architecture. Keep reading below for the explanation of how it came about.
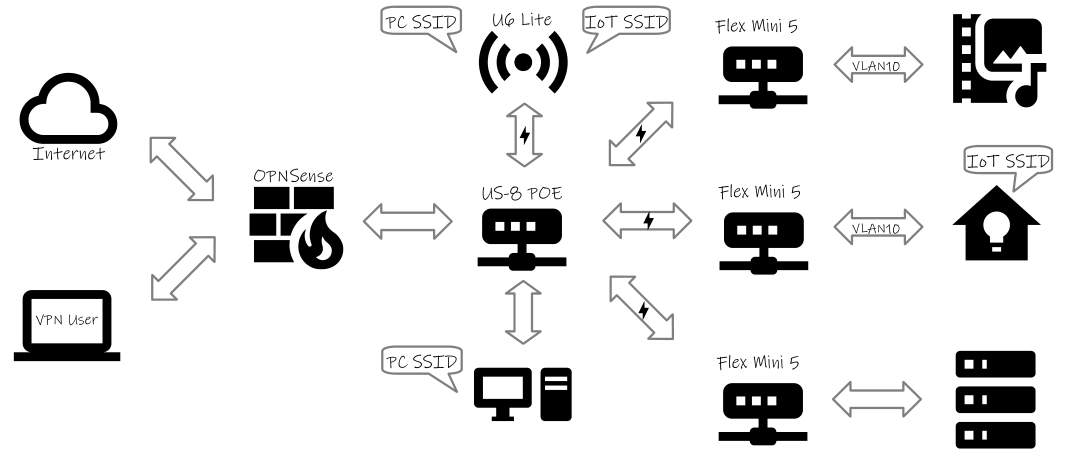
Figure 1: A visual representation of how OPNSense fits into the UniFi network
Why Would You Do This?
Internet of Things (IoT) devices are becoming more prevalent as Smart Home technology takes hold. Most of these devices are manufactured with their primary focus on convenience rather than security. This lax security posture can create a risk to your home network. Best practice recommendations are to segment the IoT devices off onto a separate network and use firewall rules to control what these devices can and can’t access on the rest of the network.
Why the Mix of Ubiquiti and OPNSense?
Ubiquiti UniFi products are popular with home installations by folks who want something more robust than the typical consumer grade networking gear. But unfortunately, the Unified Security Gateway (USG) firewall router never seems to be in stock and their other firewall router products carry a comparitively steep price tag. OPNSense is a solid alternative to USG that can run on commodity hardware. The only drawback is you are now dealing with two different systems from two different vendors instead of a single management interface.
Prerequisites
This guide assumes you know how to configure UniFi network devices using the UniFi console and how to configure the OPNSense firewall. You should also have an understanding of networking concepts like: Access Points, Switches, Routers, SSIDs, IPv4 Addresses, DHCP, and VLANs.
Hardware Used
- UniFi U6 WiFi 6 Access Point
- UniFi US8 (gen 1) POE Switch
- Beelink EQ12 dual-NIC Mini PC (firewall)
- ESP32-C3 (optional IoT client device)
Software Used
- UniFi controller 7.5.176
- OPNSense 23.7.7 (firewall)
- MicroPython 1.21 (optional IoT client device)
Overview of Configuration
The tutorial will use these values when setting up the devices. You can change them if you wish.
- UniFi SSID name: iotwifi
- UniFi network name: IoT
- VLAN tag: 10
- IPv4 subnet: 192.168.10.0/24
- OPNSense interface name: OPT1
- OPNSense interface IP: 192.168.10.1
OPNSense <–> UniFi Switch <–> UniFi Access Point <-WiFi-> IoT Client
Overview of Steps
This guide covers setting up the UniFi network gear to provide the WiFi SSID and the OPNSense firewall to provide the DHCP addresses. Because there are only two network interfaces on the Beelink EQ12, the IoT network must be created as a Virtual Local Area Network (VLAN.)
- Create a new SSID for UniFi called iotwifi and test with a WiFi client.
- Create a new Virtual Network (VLAN) for UniFi called IoT and tag it as 10.
- Assign the iotwifi SSID to the IoT network.
- Create a new VLAN in OPNSense and tag it as 10.
- Assign the new VLAN to the interface OPT1.
- Configure the OPNSense DHCP service for the new VLAN.
- Profit!
See below for detailed steps.
Caution: Some of these steps may momentarily disrupt existing WiFi connetions, even when there is no misconfiguration.
Creating the IoT SSID
Before creating any VLANs, first create a second SSID on your UniFi access point and test connectivity to the existing network.
- Open the UniFi console and navigate to Settings > WiFi.
- Use Create New to add another SSID to the access point.
- Give it a unique name and a strong password.
- Leave the Network dropdown and any other options as default for now.
- Add the new WiFi network.
Once this new WiFi SSID is configured, use a client device to connect to it. You can use a smartphone, a microcontroller, or an existing IoT device on your network. All you need to know at this point is the device can connect to the new SSID and get an IP address from DHCP.
Creating the IoT VLAN in the UniFi Console
The Virtual LAN will first be created in the UniFi console and then the OPNSense firewall will be configured to match.
Create a New UniFi Network
- Open the UniFi console and navigate to Settings > Networks.
- Use New Virtual Network to create the VLAN.
- Give it a network name of IoT and a VLAN ID of 10.
- Ensure DHCP Guarding is unchecked.
- Add the new network.
Associate the New SSID with the New Network
- Revisit Settings > WiFi in the UniFi console.
- Click on the new SSID to bring up its properties.
- Use the Network dropdown to change from the Default network to the IoT (VLAN ID=10) network.
- Apply the changes.
After this change, the IoT test client will no longer be able to get a DHCP address, but it should still associate with the UniFi access point. You can check this by returning to the SSID list (Settings > WiFi) and looking at the number of connected clients. There should still be a connection regardless of the fact DHCP is not working yet.
Configuring the IoT VLAN in the OPNSense Web Console
The previous steps created the VLAN in the UniFi infrastructure. Now, OPNSense must be configured to recognize the new VLAN and assign DHCP addresses to the client devices.
Create a New OPNSense VLAN
- Log into the OPNSense web console as an admin user.
- Navigate to Interfaces > Other Types > VLAN.
- Click the plus sign to create a new VLAN.
- Ensure the Parent is the LAN interface of your firewall.
- Use a VLAN tag of 10 (same as the UniFi VLAN tag.)
- Leave the other settings as default.
- Save the VLAN and Apply Changes.
Assign the VLAN to an Interface
- Navigate to Interfaces > Assignments
- Verify there is a New Interface available with the value vlan01 IoT (tag 10)
- Click the plus sign to add it.
- Save the change.
This configuration change should result in a new OPNSense interface called OPT1.
Configure the OPT1 Network Properties
- In the OPNSense web console, navigate to Interfaces > OPT1.
- Basic Configuration: Enable Interface must be checked.
- Basic Configuration: Block private networks should be unchecked.
- Generic Configuration: IPv4 Configuration Type needs to be set to Static IPv4.
- Static IPv4 Configuration: IPv4 address must be 192.168.10.1/24
- Save the configuration and Apply Changes.
Once this step is finished, return to the OPNSense Dashboard (Lobby > Dashboard) and scroll down to Interfaces and Interface Statistics. Verify the OPT1 interface exists and has an IP address of 192.168.10.1 before proceeding.
Configure DHCP for the IoT network
- In the OPNSense web console, navigate to Services > DHCPv4 > OPT1.
- Enable DHCP server on the OPT1 interface checkbox needs to be checked.
- Enter the range of IPs available for the DHCP server. For example: 192.168.10.50 to 192.168.10.199
- Other DHCP parameters can be left as default.
- Save and Apply the DHCP configuration.
After completing this step, reset the IoT client device. Check the UniFi console under WiFi and look for a connection to the iotwifi SSID. Check the OPNSense console under Services > DHCPv4 > Leases and look for an IP address assignment.
Troubleshooting
There are basically two things that can cause an IoT device to complain that it can’t make a connection:
- It cannot connect to the access point.
- It cannot obtain a DHCP address.
To verify connection to the access point, use the UniFi console. Navigate to Settings to view the UniFi access point SSID list. Pay attention to the column labeled Clients (Peak). Keep in mind you may need to refresh the browser to get a current and accurate count of clients. If you see a connection, it means your IoT device has the correct SSID and password.
You may also want to use the UniFi console’s Topology view to see if your IoT device appears. My MicroPython device appears as mpy-esp32c3 in the topology view. With the client details switched on, you will also see the SSID the client device is associated with.
To verify a DHCP address lease for the device, use the OPNSense console. Navigate to Services > DHCPv4 > Leases and look for an IP address assignment in the range of your IoT subnet. (192.168.10.50 to 192.168.10.199 if you’re following the examples here.)
To help narrow down the problem, use the UniFi console. Navigate to Settings and assign the SSID to the Default Network. If your IoT device can connect and get an IP address, you know the SSID and password is okay. You can then focus on troubleshooting DHCP and VLAN.
First, use the UniFi console to move your IoT SSID back to the IoT network before you continue.
Next, navigate to UniFi Devices in the UniFi console. Select the switch between the UniFi access point and the OPNSense firewall. Use Port Manager to examine the switch ports where these devices attach. Ensure the ports have Traffic Restriction turned off. (Users with advanced configurations may need to add the IoT VLAN to the allow list, but for most, disabling traffic restriction is the best option.)
In the OPNSense console, access the Lobby > Dashboard. Examine Interfaces to ensure the IP configuration is correct and the OPT1 interface is up (shown in green.) Also check the Interface Statistics. The OPT1 interface should show packets in and packets. It will be a small number, but should be greater than zero. If no packets are flowing, double check the interface setup.
You can also check the OPNSense configuration from the SSH interface using the command ifconfig. You should see your IoT VLAN as part of the output.
Next Steps
The whole reason for creating a separate IoT network is to improve your network’s security. To do this, you’ll need to create firewall rules in OPNSense. While the setup for your network is unique, I have a document explaining what I configured for my network that you can use as a guide: Firewall Rules